Follow this simple training exercise to learn how to use the CHAI Hospice App and to understand its core features. Key words have links to the CHAI User Guide.
Sign in to your Personal CHAI Record and step through the following 10 tasks.
During this exercise, you will use your Personal CHAI Record as an example patient record.
You can change and update your record whenever you like after completing this training.
Each Task should be visible in the Patient Notes section of CHAI (we will show you how to find this shortly). Once you have completed any given Task, click the square on the left of each Task in Patient Notes to mark it as ‘task complete’.
Throughout this exercise, keep an eye on your patient’s (you in this training case) Banner .
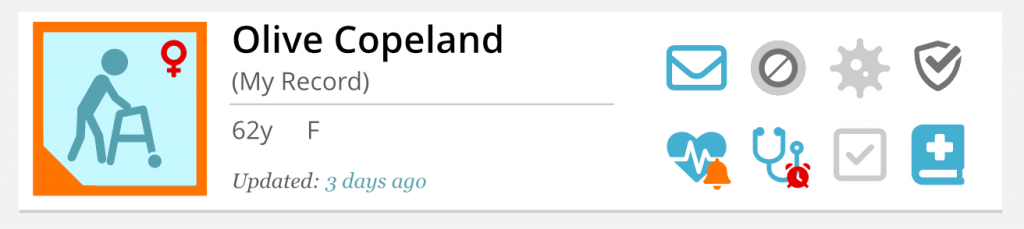
This may change depending on the information you add to your record and will highlight any important things you need to be aware of at a glance.
There are also several icons on the right of the banner that are Shortcut & Status Indicators to the buttons that we will be discussing below so that you can access information quickly when needed.
- Jump to Tasks:
- TASK 1: Navigate to the Patient Summary Page
- TASK 2: Complete Important Information
- TASK 3: Create a Patient Note
- TASK 4: Create a Task
- TASK 5: Completing the Admissions form
- TASK 6: Use an Assessment Tool
- TASK 7: Use a Care Plan
- TASK 8: Enter Covid-19 Assessment
- TASK 9: Print information as PDF documents
- TASK 10: Find Tasks that are overdue
TASK 1:
Navigate to the Patient Summary Page Also known as the Patient Home Page
There are lots of buttons in CHAI that will direct you away from the Patient’s Summary Page . If you are ever unsure of where you are in the App you can easily return to this page.
- Whilst you are on the Summary Page, click on some of the button options in the Menu on the left of your screen (the list of icons that starts with * ‘Admissions’ or ‘Patient Overview’ at the top). *System dependant
- Now navigate back to the Summary Page by clicking the square box to the left of the patient’s name (your name in your training/Personal Record) in the Banner at the top of your screen.
- Later on this box will contain a Personal Icon showing summary information.
- Two very useful panels will then be visible:
TASK 2:
Complete Important Information
The Important Information section lists key information that should be entered for all patients. Each item on the list is a button that you can click in order to enter that information into CHAI.
Once completed, the item on the list will either update to display the information or it will disappear from the list and the information can be retrieved from the appropriate section in the record when needed – the same place you entered the information).
- Click on each item in the Important Information list and enter the information needed.
- Remember to click ‘Submit’ at the bottom of each form for the information to be saved.
- Return to the Summary Page after completing each form (Task 1).
TASK 3:
Create a Patient Note
Patient Notes help you to keep track of important things related to supporting a patient.
- Create a note within your record saying ‘Patient had a pain free night’. To do this, scroll to the top of Patient Notes and follow the instructions.
- For future reference, you can add attachments, voice recordings and pictures in here too.
- Click “Submit” and find your new note at the top of your Patient Notes.
TASK 4:
Create a Task
Tasks are created in your Patient Notes as a reminder to perform a given task.
- Create a task for you to call the family to request more nightwear. You do this the same way as creating a note but click the tick box in the outer blue box before hitting “Submit”
- You can assign the task to yourself or anyone else that appears in the drop down selection. Assign the task to yourself.
- The type of task can also be categorised if needed.
- Add when this task is due (set to 5 minutes so that you can see how overdue and assigned tasks are identified later on in the exercise).
- Click ‘Submit’ and the new task will be at the top of your Patient Notes after you have refreshed the page.
- You can filter the patient notes by Task by clicking on the Tasks filter at the top of the patient notes section.
TASK 5:
Add details to the Admissions Form *
* Depending on your system the Admissions form may be called something different such as Patient Overview. The form is split into sections with each section containing a number of cards which are filled in and submitted individually.
- Enter the *Admissions Form by going to the Summary Page and clicking ‘*Admissions’ in the left menu list.
- A number of further buttons will appear for you to choose from. These are sections within the form.
- Having clicked an option you can click ‘next’ and ‘prev’ to navigate the remaining options or simply go back in your internet browser. You can also navigate through the sections using the quick link icon row above below the patient banner.
- Try entering some details on the patient details card including Frailty (just examples or about yourself since this is your record) and submit. The card you have just entered details on has turned green. This means it was completed by you. Blue indicates that details have been added by a different user. White indicates no details have been added. Return to the Summary Page (Task1).
- You may see some of the information you have just entered on the Summary Page. This could be in the ‘Important Information’ list or as text near the top of your screen by the Personal Icon which now contains a ‘stickman’ to represent the frailty entered.
TASK 6:
Use an Assessment Tool
CHAI contains a number of assessment tools which can be completed multiple times and allow the history to be viewed. These can all be located within the Assessment Tools buttons on the left hand menu in the Summary Page.
- Create a Contact Log Entry: Work through the on-screen questions, clicking the tick or cross as appropriate, typing information in or clicking the relevant circle. When returning to this log, some information may be pre-populated from previous log entries and this can be left if nothing has changed.
- Enter a time for the next contact as 5 minutes from now so that you can see what happens when something is due to take place.
- Remember to hit ‘Submit’ at the bottom of the page to save the information.
- You can view previous entries by clicking on ‘History’ at the top right of the form.
TASK 7:
Use a Care Plan
A number of care plans are available which can be selected for use as and when needed.
- Activate any of the Care Plans available by tapping the slider button to the left of the care plan name.
- Once activated, click the button above to open the form.
- Tick off the care plan actions and “Submit” the form.
- Care plans can be deactivated using the slider button. A reason why the patient no longer requires the care plan must be recorded.
TASK 8:
Enter a Covid-19 Assessment
CHAI offers a simple way to keep track of a patient’s COVID-19 status.
Enter a Covid-19 Screening status and click the ‘Household Testing’ button to record the test details for anyone in the household who has taken a COVID-19 test. You will notice that the icon and Covid status text in the patient banner changes to reflect the status selected.
TASK 9:
Print information as PDF documents
Information recorded in CHAI can be printed to PDF documents.
- Click the ‘Forms and PDFs’ button in the left menu.
- Select the any form and print is located at the bottom of the screen.
- Remember that you have to enable pop ups on the device that you are using so that the new window containing the PDF opens successfully.
- You can also create pdfs of the care plans and assessment tools by clicking Print on the top right corner of each form.
TASK 10:
Find Tasks that are assigned to you.
Tasks are automatically and manually set in CHAI and they appear in Patient Notes. A minimum of one task will now be assigned to you and overdue (see Task 4).
- Find tasks that have been assigned to you by clicking the icon in the top left of the screen.
- You will find the Task you created in Task 4.
- This will have an orange alarm bell icon, and a message about when due. ( The alarm bell icon will be red if the task is overdue).
- Open the task by clicking on it. Here you can change the status of the task and add any comments. All actions will be recorded in the history section.
- This reminder is cancelled when you change the status of the when it is completed.
You have successfully completed the CHAI training exercise.
All these features will become easy to use with a little practice. Try repeating the training in a few days without referring to the User Guide. Note that the User Guide contains Tips and Frequently Asked Questions (FAQ) and much more.
Access the User Guide at any time when using CHAI at the foot of every page.